The data protection policies for Apple users has changed with the release of the iOS 14 operating system, according to Apple which in turn has really impacted Facebook ad delivery and overall performance.
In particular, unless iOS 14 users give their consent, Apple will restrict the gathering and sharing of specific data.
Facebook has built a particular protocol to handle events from iOS14 devices in order to handle this change and to allow marketers to keep running successful ads while protecting user privacy. This is the Aggregated Event Measurement tool.
Here, I explain how to best configure the Aggregated Event Measurement tool according to the events detected by your pixel on your site.
Step 1
Open your Business Manager account and log in. “Events Manager” should be in the “Shortcuts” section of the menu when you click the menu icon.

Step 2
Choose your pixel (if you have more than one)

Step 3
Click on the “Aggregated Event Measurement” tab and then click on “Configure Web Events” :

Step 4
You must first have your domain checked. Click “Verify Domain” and follow the on-screen instructions to accomplish this. You can alternatively adhere to the Facebook developer guide or the official Facebook documentation.
After completing this, click the number next to the number of events that have already been configured (it should generally be 0 if you have never configured any events before), the click on “Edit Events”

Step 5
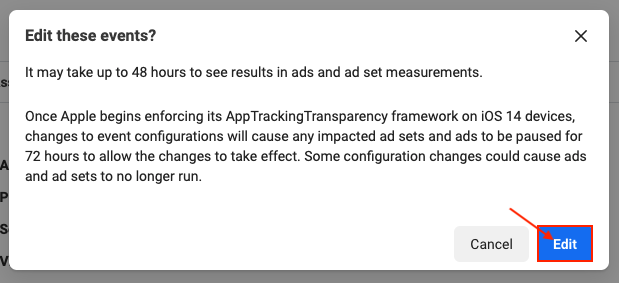
An information pop-up appears. Click on “Edit”:

Step 6
Check the right side of the screen and click on “Add Event

Step 7
Select the pixel associated with the domain:
Step 8
Then click on the drop-down list of events next to it:

Step 9
If you’ve already created campaigns based on pixel events, Facebook will automatically list the events that are most relevant to your company based on the success of your advertising. Not every pixel event may have been displayed just yet (as in the example below). Probably the missing events have not been fired to appear here. They need to be displayed after you have adequate data. Initially, choose and prioritize the ones that are already available.
Consider choosing the “Purchase” event, which is undoubtedly the most significant and therefore the highest priority event for you:

Step 10
Then click again on the “Add Event” button and repeat the 2 previous steps to select a new event. Do this for a maximum of 8 events that you have chosen as priority. In the example above, there are only 4 of them available so here we get a list of 4 events, but we advise you to add as many as possible (up to 8)
Knowing that the highest priority event will be the most significant, rank them in order of importance. You can accomplish this by selecting an event and dragging it, like the below.
Then click on “Submit/Apply” at the bottom right corner
Consider what is most important for the optimization of your advertising campaigns when determining the order of events. Facebook’s Aggregated Event Measurement tool will only keep one event, the one you’ve selected as having priority over the other, if, for instance, the “Add to cart” and “Search” events are stored on the same conversion window. Place the “Add to cart” event higher than the “Search” event if you’d rather save the “Add to cart” event than the “Search” event.
Here is what I believe to be a consistent priority order for some common events captured by the module’s pixel:

Step 11
Do not forget to click on “Submit” once your events are created and ranked. Check the box to accept changes and click on “Apply”:

And that’s all.
You should start seeing positive response in your campaigns henceforth
Note: It might take up to 48/72hrs for this fully take effect
Leave a comment if this is helpful
Follow my social media handles